
jodief100
True BYH Addict
I made this single bale hay rack for my goats. It took about 2 hours and it cost me less than $20. I scrounged all the wood. If you have to buy the the cost will be around $40. The biggest expense is the goat panel. 1 16' goat panel will make 3 hay racks.
The pictures suck because the light wasn't very good. When I make another one I will try to get new ones.
Materials Needed:
2 x 4
Quantity 4, 48" long
Quantity 4, 36" long
Quantity 5, 51" long
Goat Panel:
The goat panels I buy are 48" high. The design uses the 48" height so you only have to cut one end. If your goat panels are taller or shorter, adjust the 51" long 2 x 4's buy 4 inches for every four inches different the goat panel is.
Cut two sheets 28" (7 squares) x 48" (12 squares).
1/2" plywood. This can be thicker if that is what you have.
36" by anywhere from 16" to 28"
Fence staples, at least 2.
Nails or screws, 2 1/2" long.
Step 1:
Nail one of the 36" long 2x4's to two of the 48" long 2x4's with the top of the 36" long 2x4, 26 1/2" from the top of the 48" long 2x4's.
Repeat for the other side.

Step 2:
Attach the two sides by nailing the 51" long 2x4's from the top of the 48" long 2x4's and in the center, setting on the 36" 2x4's. Make sure the horizontal 2x4's are on the inside of the frame. **If you are using this with smaller goats, I recommend putting the longer horizontal 2x4's below the shorter ones**

Step 3:
Attach the 5th 51" long 2x4 flat (wider side down) across the center of the frame, sitting on top of the 36" 2x4. Make sure the center of the 51" 2x4 is in the center of the frame.

Step 4:
Set the goat panels resting on the top of the flat 2x4 in the center. The tops will be resting against the horizontal 2x4's at the top of the frame.
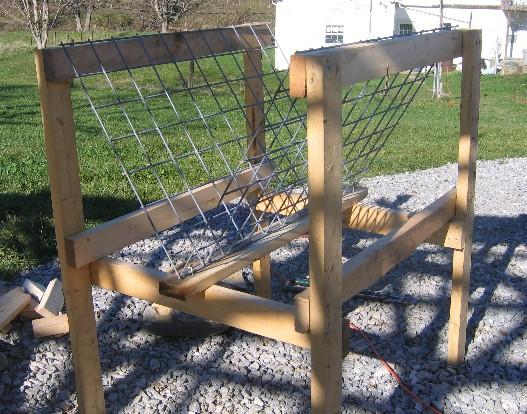
Step 5:
Attach the goat panels to the flat 2x4 with fence staples.

Step 6:
Nail the remaining 2 36" 2x4's flat (wide side down) across the top of the shorter side of the frame. This must be done after the goat panels are in place.
Nail the plywood to the sides.

The pictures suck because the light wasn't very good. When I make another one I will try to get new ones.
Materials Needed:
2 x 4
Quantity 4, 48" long
Quantity 4, 36" long
Quantity 5, 51" long
Goat Panel:
The goat panels I buy are 48" high. The design uses the 48" height so you only have to cut one end. If your goat panels are taller or shorter, adjust the 51" long 2 x 4's buy 4 inches for every four inches different the goat panel is.
Cut two sheets 28" (7 squares) x 48" (12 squares).
1/2" plywood. This can be thicker if that is what you have.
36" by anywhere from 16" to 28"
Fence staples, at least 2.
Nails or screws, 2 1/2" long.
Step 1:
Nail one of the 36" long 2x4's to two of the 48" long 2x4's with the top of the 36" long 2x4, 26 1/2" from the top of the 48" long 2x4's.
Repeat for the other side.
Step 2:
Attach the two sides by nailing the 51" long 2x4's from the top of the 48" long 2x4's and in the center, setting on the 36" 2x4's. Make sure the horizontal 2x4's are on the inside of the frame. **If you are using this with smaller goats, I recommend putting the longer horizontal 2x4's below the shorter ones**
Step 3:
Attach the 5th 51" long 2x4 flat (wider side down) across the center of the frame, sitting on top of the 36" 2x4. Make sure the center of the 51" 2x4 is in the center of the frame.
Step 4:
Set the goat panels resting on the top of the flat 2x4 in the center. The tops will be resting against the horizontal 2x4's at the top of the frame.
Step 5:
Attach the goat panels to the flat 2x4 with fence staples.
Step 6:
Nail the remaining 2 36" 2x4's flat (wide side down) across the top of the shorter side of the frame. This must be done after the goat panels are in place.
Nail the plywood to the sides.
 Thanks!!!!!
