Why didn't you guys warn me?

Xerocles

Loving the herd life
Joined
Nov 11, 2019
Messages
540
Reaction score
1,573
Points
173
Location
Clinton (piedmont) SC
We get the north wind off the high plains. Brrrrr. Yup, kinda directional oriented here. Seriously, you should predator proof the rabbit barn, same as you would a chicken coop. I’ll shut up now.
I probably will "predator proof" the rabbit shed....but for different reasons than you are thinking. I'll explain that in @Xerocles rabbit thread in the next day or so.
 

B&B Happy goats

Herd Master
Joined
Oct 7, 2018
Messages
4,849
Reaction score
12,895
Points
633
Location
North central florida
When your loose eough chickens or rabbit's you will regret not having protected them from predators, after finally adding hot wire to the top of our chicken and rabbit area, the racoons. Possums, and whatever else creeps in the night have gone away.....and we had THREE dogs out side, one of which was a LGD......where does your dog sleep at night ?
 

Ridgetop

Herd Master
Joined
Mar 13, 2015
Messages
6,707
Reaction score
22,836
Points
693
Location
Shadow Hills, CA
OK. We had over 100 hanging cages in our old rabbitry. All wire, all hung from chains. Minimal sway. Automatic water lines from cage to cage. I hung them all.

I hung most of them myself. Some I had help from 5 and 6 year old sons - I balanced the cages on their heads while I attached the chains. Most of the cages I hung while they were all in school and balanced the empty cages on trash cans or a step ladder

Here is how to do it easily and quickly. First step:
1. Measure the width of the cages and the depth. The standard size for a meat rabbit cage is 36’ x 30” deep for a doe and her litter. I used the same size for both bucks and does in order to have more flexibility in my rabbitry. It is worth the money to order the cages with the “babysaver” feature. If you don’t have this, just attach extra wire screen around the bottom sides of the cages 6” up. If the doe kindles (gives birth) on the floor of the cage instead of in the nest box you provide, the babies just crawl blindly around the floor of the cage. Unlike cats and dogs, the mother rabbit does not gather her babies up, so the crawling kits can crawl out of the cage through the normal 1” x 2” mesh spacing and fall onto the barn floor. With the babysaver feature, you can scoop the chilly little babies off the wire floor, rush them into the house, dunk them in cups of warm water until they warm up, place them on a hot water bottle and revive them, before placing them into the nest box. Cold kills newborns faster than starvation. There is a reason rabbits produce so fast and are at the bottom of the food chain.
2. Identify where the chains will hang from the overhead rafters using those measurements.
3. Drill pilot holes into rafters at the spot here you will attach the chains.
4. Screw hooks into the rafters in the pilot holes.
IMG_5429.jpg Hooks need to be sturdy enough to support 200 lbs. That is when you over balance while trying to catch that doe and fall into or onto the cage, grabbing the chain to keep from crashing to the ground. Try to be alone when this happens or your family will bring up the time mom got stick in the rabbit cage at family gatherings.
IMG_5430.jpg Chains need to be sturdy to hold 200 lbs. See above, also remember that the doe and her litter of 8-10 kits will weigh over 60 lbs. Add in the food dishes, next boxes, etc. and you will see after you finish reading the instructions why I recommend a 200 lbs.
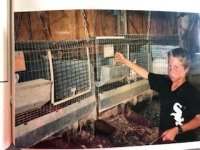
gross weight support.

Second step:
  1. Measure how far from the ceiling you want the cages to hang. They should be between waist level (cage bottom) and eye level (cage top) so you can access the cages easily. You will be lifting rabbits weighing between 5 lbs. (fryers) and 12 lbs. (breeders) in and out, along with nest boxes. The height needs to be correct for your comfort. If you are unsure, cut the chains a couple links longer. You can always raise the cages on the hooks by a link or so, you can’t lower them if the chains are too short.
  2. Cut the chains to the desired length. (Cut the first one, hang it and check it before cutting all the others). You will need a bolt cutter for this step.
  3. Attach the connectors – clevises or snap hooks – to the chains and then attach the chains to each corner of the cages.
  4. If you are going to attach optional “privacy panels” – used to prevent bucks spraying on does or each other – attach them to the outside of the cage before hanging.
  5. Set the cages in a line on the floor beneath where you want to hang them. Assemble your platform for the first cages. (I used upside down garbage cans to raise the cages higher so I wasn’t supporting all the weight myself.) The wire cages are light so you might not need to use any supports after the first couple of cages are hung.
  6. Hook the first set of chains on one side of the cage to the overhead hooks. The cage will hang down on one side.
  7. Now attach the second set of chains on the other side.
  8. Continue this procedure for several cages, hooking the chains for 2 adjacent cages onto one hook.
  9. Now go back to the first 2 cages and unhook one of the adjacent chains. Then connect the first cage’s connector hook to the second cage so one chain is supporting 2 cages. Do this along the line of cages at all the adjacent corners you have already hung until all the cages are hung this way.
  10. Doing this will prevent sway, and save you a lot of $$$ on chains and connectors.
IMG_5431 (1).jpg Here is our old rabbitry which was very functional and easy to keep clean. You can see the cages are hung from chains at the corners. The J feeders are 12" screen bottom. You can see the privacy panels between the cages and the urine guards on the front. The cages all have cage card holders which take a 3" x 5" recipe card and the cards can be moved with the rabbits when they are moved to different cages in the rabbitry. You can't see the watering system because at this time I was using a combination automatic system which used pvc pipes and drinkers mounted at the back of the cages. In other parts of the barn I used flexble tubing and drinker valves.

Optional: Once all the cages are hung up, you can attach urine guards to the front bottom of the cages. These are short lengths of metal that hang from about 4” above the bottom of the cage to about 4-6” below the front edge of the cage. These are designed to protect you from receiving aa stream of rabbit urine down your legs as you do your rabbit chores.

Now you are ready to put in your feeders and waterers. You can use either crocks which can be removed and washed occasionally, or J feeders that fit through the cages and allow you to feel from the outside of the cage. If you decide on J feeders, make sure to get the ones with screen bottoms. This will allow the “fines” (leftover dust from the rabbit pellets which the rabbit won’t eat) to soft through to the ground. Personally, I prefer the J feeders since it is easier to feed and saves space inside the cage. Use 12” feeders for a doe and her litter. Again, in the interests of flexibility I eventually just used the 12” feeders in all the cages.

Waterers can be either crocks, suspended water bottles – I found the 2 liter bottles with the tubes to be fine for up to 12 rabbits. After that you might want to invest in an automatic system. Not expensive and easy to install. Several things to remember with all 3 of these watering systems –

Make sure to wash out our crocks to avoid algae. In the 2 liter bottles, adding 1/8th tsp to the bottle will keep those bottles from getting algae in them. With the automatic system, remember to check the valves every few days to make sure they are not clogged. Th all of them, if you live in extreme temperatures you will need to watch for freezing or over heated water. The rabbit will not be able to or will be unwilling to drink.

By the way, on the pix of the cages the cards on the front are “cage cards” which are invaluable in writing down breeding dates, which buck she was bred to, date the doe kindled, how many in the litter both alive and dead.

Hope this helps. If you need any more information, post. My barn was 24' x 36' and held 100+ cages of NZW which we bred for show and meat.
 

Attachments

  • IMG_5432 (1).jpg
    IMG_5432 (1).jpg
    25.2 KB · Views: 166

Xerocles

Loving the herd life
Joined
Nov 11, 2019
Messages
540
Reaction score
1,573
Points
173
Location
Clinton (piedmont) SC
OK. We had over 100 hanging cages in our old rabbitry. All wire, all hung from chains. Minimal sway. Automatic water lines from cage to cage. I hung them all.all
God bless you for this information! Very helpful. Now, where were you when I needed you? :lol:
Just finished hanging all my cages today. Not nearly as efficiently as what you describe, though. I looked mightly for a 5 yr old for a support and couldn't find one.
One question, when using water bottles, you suggest using 1/8 spoonful....but failed to say what. I am guessing apple cider vinegar?
 

Ridgetop

Herd Master
Joined
Mar 13, 2015
Messages
6,707
Reaction score
22,836
Points
693
Location
Shadow Hills, CA
5 year olds were easy to find then. The 10 year old in the pic was one of them. Lol he is 35 now. I have to use a grumpy old guy now. No it’s easier to do it myself! Lol. Although it you need to know how to hang a wire fence alone I can tell you how DH aka grumpy old guy did it. Proving once again that age and guile triumph over youth and clueless helpers.
 

YourRabbitGirl

Overrun with beasties
Joined
Dec 17, 2019
Messages
429
Reaction score
174
Points
91
Rabbit cages. All wire. Suspended.
Why didn't you guys warn me?
A. That it takes at least three people to hang,
level, and align them? I had to build a frame tall enough to set them on, first. Even then, its a nightmare to adjust the
Chains so they're level all the way around.

B. How to stop them from swinging? 4 or 6. chains per cage (depending on length). And everytime I touch them, they swing. Poor bunnies are going to have chronic sea-sickness. Can you even GIVE rabbit Dramamine? I want lots of kits, but how do I stop the bunnies from being. "swingers"?

I know. You guys were sitting back chuckling, saying "wait til he trys hanging them. He'll come crawling back, begging for our help,"
Well.......HELP!!!
A rabbit needs a good-sized hutch or cage preferably with two compartments. ... The floor should be covered with newspaper with a layer of bedding material placed on top of the newspaper (straw, grass hay or shredded paper) to provide warmth, comfort and to prevent the rabbit from developing pressure sores on their feet. :):):):)
 

Duckfarmerpa1

Herd Master
Joined
Oct 30, 2019
Messages
1,798
Reaction score
3,370
Points
313
Location
Kane,PA
God bless you for this information! Very helpful. Now, where were you when I needed you? :lol:
Just finished hanging all my cages today. Not nearly as efficiently as what you describe, though. I looked mightly for a 5 yr old for a support and couldn't find one.
One question, when using water bottles, you suggest using 1/8 spoonful....but failed to say what. I am guessing apple cider vinegar?
I suggest you ask @Ridgetop all your breeding questions! He cleary had it down to a science! I have a binder for my breeder info, but, sometimes it does slip my mind to write it down...I was going to ask the same question!!
 

YourRabbitGirl

Overrun with beasties
Joined
Dec 17, 2019
Messages
429
Reaction score
174
Points
91
We get the north wind off the high plains. Brrrrr. Yup, kinda directional oriented here. Seriously, you should predator proof the rabbit barn, same as you would a chicken coop. I’ll shut up now.
It's a pretty basic, right? whether what kind of animal it is. it needs to have a proper house or location. no questions. I always make sure they are safe. I love them and I prioritize them.
 
Top