How to post pics

Status
Not open for further replies.

Farmer Kitty

True BYH Addict
Joined
Jul 3, 2008
Messages
10,409
Reaction score
17
Points
244
Location
Wisconsin
Okay, There is a great thread on this subject on BYChickens. I'm going to copy and paste it here for anyone with questions.

Nifty-Chicken
Administrator

From: Northern California
Registered: 12/26/2006
Posts: 5391
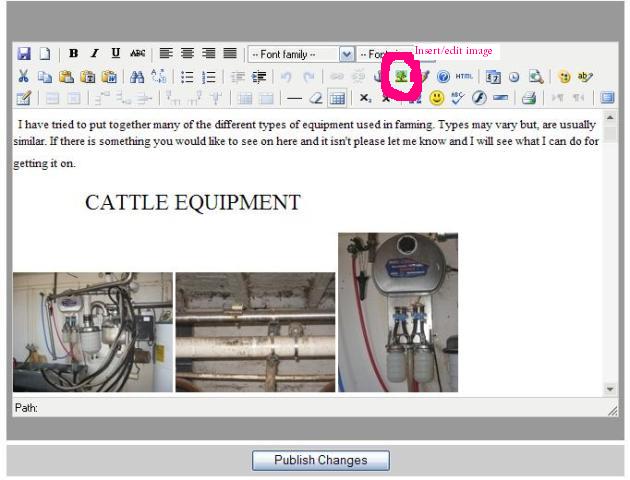
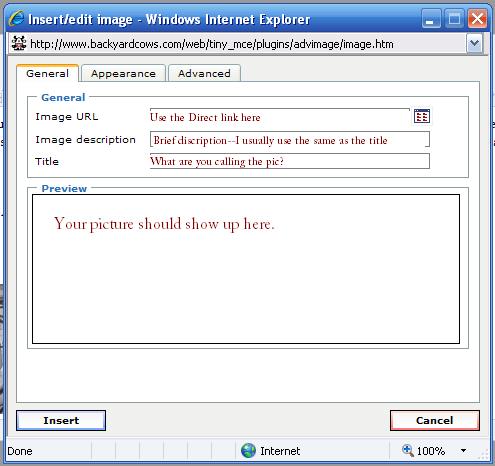
PM Website How to Post / Add Pictures To Your Posts & MessagesTo Post Photos Onto the FORUM:

1. Upload your photo to a photo hosting site (two options below) and resize it for the message board (640x480 or smaller).
2. Copy the URL for the photo and paste it in your message.
3. Highlight the URL in your message, then click on "Img" button above the message. Your URL will be wrapped by two image tags and will look like this:

4. Use "Preview" button to check the picture before submitting.


How To Post Pictures Using Our new BYC Image Hosting tool:

1) Click on the "Uploads" link at the top of the page: http://www.backyardchickens.com/forum/uploadimg.php
2) Click "Browse" to find the image on your computer
3) Upload the image to the server and then you'll be presented with the image code to paste into your post here on the forum


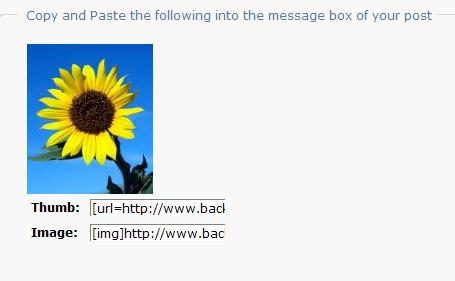
How To Post Pictures From Photobucket:

1) Login to your account
2) Copy the "IMG CODE" (as seen in the 3rd option in the image below).
3) Paste the code as-is into your forum post. You do NOT need to use the Img tags as they are already included from Photobucket.


I'll have Chel submit more detailed instructions on how to submit pictures to Photobucket in the next post.


--------------------------------------------------------------------------------
7 hens: 1 Delaware, 2 RIR, a Gold laced mix, a RIR / Black Aust. mix and 2 silver laced wyandottes, 1 duck: a crested runner mix
www.TheEasyGarden.com | www.SufficientSelf.com | www.BackYardCows.com
 

Farmer Kitty

True BYH Addict
Joined
Jul 3, 2008
Messages
10,409
Reaction score
17
Points
244
Location
Wisconsin
eggchel
Moderator
From: Everywhere
Registered: 12/27/2006
Posts: 2209
PM Re: How to Post / Add Pictures To Your Posts & MessagesHow to use Photobucket to Post Pictures
1. Sign up for a free Photobucket account: http://photobucket.com/register.php?link=register_now

2. Find the Uploading panel, it looks like this (except with your name, not mine, lol) :


3. Enter the image file name or click "browse" to find the file in your computer. Click "add more images" to upload multiple files.

4. Click "uploading options" for a drop down size menu and select "message board size" or smaller to resize your photos while uploading.

5. Click "upload". When Photobucket is finished uploading, scroll down to see your photo. The photo is a thumbnail, click on it to see it full size.
Now is the time to resize it if you forgot to do so while uploading it. It will look like this:


6. Now the easy part ..... you can copy the Img Code just by left clicking on it, and then paste it in your forum message.

Note:


The URL Link is for linking to the photo. The image itself will not appear, just the URL for the image.

The HTML Tag code is used to post on websites, eBay, MySpace, etc.

The IMG Code is used on message boards (such as our own). It will post the actual picture.


For more detailed instructions :

Here is the Photobucket tutorial for uploading a single image to your photobucket account from your computer:
http://tutorials.photobucket.com/tutorial_3.html
Here is the Photobucket tutorial for uploading multiple images to your photobucket account from your computer:
http://tutorials.photobucket.com/tutorial_39.html

And, here is one more link to helpful instructions on uploading and posting pictures:

http://p072.ezboard.com/fbackyardchicke =453.topic


Please Preview your message before posting.

chel
 

Farmer Kitty

True BYH Addict
Joined
Jul 3, 2008
Messages
10,409
Reaction score
17
Points
244
Location
Wisconsin
Nifty-Chicken
Administrator

From: Northern California
Registered: 12/26/2006
Posts: 5391
PM Website Re: How to Post / Add Pictures To Your Posts & MessagesA Quick Update: How To Add An Avatar:
An avatar is the small picture under your userID. Here is how you can add one to your profile:

1) Make sure you are logged in
2) Click the "Profile" link in the top menu
3) In your Profile click "Personality"
4) Make sure you check "Use avatar"
5) Click "Upload avatar"
6) Choose an image from your computer.

NOTES: The image must not be any bigger than 100 x 100 pixels and 15240 bytes (15 KB).

If you can't resize your image try the following:

1) Visit: http://www.shrinkpictures.com/
2) Browse for the image and set the Custom max size to 100 and click "resize"
3) Save the resized image to your computer and then follow the steps above.

VIDEO TUTORIALS:

Uploading an avatar:
http://www.backyardchickens.com/media/wink/avatar.htm

Shrinking an avatar using "IrfanView"
http://www.backyardchickens.com/media/w shrink.htm
 

Farmer Kitty

True BYH Addict
Joined
Jul 3, 2008
Messages
10,409
Reaction score
17
Points
244
Location
Wisconsin
Nifty-Chicken
Administrator

From: Northern California
Registered: 12/26/2006
Posts: 5391
PM Website Re: How to Post / Add Pictures To Your Posts & MessagesImage Sizes:

Everyone's pictures posted in the forum should be max of 800 pixels wide. Even if the forum resizes pictures, it only changes the display size, the file size remains the same... basically slowing down the forum for people with dialup.

We should all make sure our pictures are not wider than 800 pixels. If you want to have the detail of a huge picture, use the thumbnail image and / or just link to the full size image.

If you notice users posting huge images, gently and kindly ask them to resize their image and edit their post with either the new image size.


--------------------------------------------------------------------------------
7 hens: 1 Delaware, 2 RIR, a Gold laced mix, a RIR / Black Aust. mix and 2 silver laced wyandottes, 1 duck: a crested runner mix
www.TheEasyGarden.com | www.SufficientSelf.com | www.BackYardCows.com
 

Nifty

Herd Master
Administrator
Joined
Nov 13, 2007
Messages
2,104
Reaction score
1,174
Points
343
Farmer Kitty, great job, thanks for doing that!!!
 

Farmer Kitty

True BYH Addict
Joined
Jul 3, 2008
Messages
10,409
Reaction score
17
Points
244
Location
Wisconsin
How to add images to your "My Page"

1. Click on "My Page" in the blue bar above.

2. You should get to your "Home Page". You can also do other pages by clicking on Add new page then you will be asked to name your new page and once you click create page you should be at your new page.

3. Click on "Click here to edit".

4. You should then get the My Page Editor.

5. Put the blinking line where you want your image.

6. To add an image click on the image/editor.
5_mypageeditor.jpg


7. Fill in the blanks.
5_insert_edit_image_screen.jpg


8. Click insert. Your image should now be on your page.

9. When you are done working on your page click on Publish Changes.

Now you should be looking at your "My Page" as everyone else will see it.
 

Farmer Kitty

True BYH Addict
Joined
Jul 3, 2008
Messages
10,409
Reaction score
17
Points
244
Location
Wisconsin
If you don't have a photo image hosting site account and will only be posting a limited amount of pics we do have photo image hosting here. It can be accessed through the "uploads" button in the blue bar above.
 

Farmer Kitty

True BYH Addict
Joined
Jul 3, 2008
Messages
10,409
Reaction score
17
Points
244
Location
Wisconsin
If you are using the "Upload" photo imaging host then there is a little variation when posting to "my page" pages.

1. You only have two choices. Thumbnail and Image.
5_post_pic_from_uploads.jpg


2. If you choose Image then you need to remove the tag on both ends.

3. If you choose the Thumbnail then you need to remove more. Here what you need to remove is highlighted in red.
[img]http://www.backyardherds.com/forum/uploads/5_5_link_problem_thread.jpg
The rest is the same.
 

elevan

Critter Addict ♥
Joined
Oct 6, 2010
Messages
13,870
Reaction score
739
Points
423
Location
Morrow Co ~ Ohio
A simple way to add pictures that are already on the internet:

Any picture which is on the Internet has a 'name' or what we'd call an 'address' which is unique to it and it tells anyone where this photo is, or the formal name used among techies is "source location". This address/source location tells any computer or browser where to look for the photo.
(This is my avatar with its address pulled from the space at the left of the screen)
2607.jpg


Here are the steps:

1) Open the page that has the pic on another tab, or window. Photo resource locations, such as Flickr, PhotoBucket, Facebook, etc.
2) Click on the photo you want to upload to BYH.
3) When it opens up in your separate tab, right click on the photo.
3) Select View Image Info and click on it.
4) Another window appears showing you the detailed description of the photo you have just selected. Such as Location, Type, Size, Dimensions.
5) Copy the entire string for Location. For eg. "http: //sphotos.ak.fbcdn.net/hphotos-ak-snc4/hs768.snc4/66850_101500" it will always start with http because it is pointing back to the source location on the web where you have placed your photo. Copying means click "Ctrl C, or Command C or right mouse click" depending on what type of computer you use.
6) After you have copied the whole string of letters, go to the BYH tab / page.
7) Go to your Create New Post or Post Reply page, depending on what you want to do.
8) Click on Img icon.
9) Paste your entire string within (between) the
tags. For eg.
b]
. Pasting means, click "Ctrl V"

Note: In some browsers you can right click on the pic and choose the option "copy image url" and skip steps 3-6.

Important to note:
As you are typing in the create message/create post and pasting your strings, you won't see the photograph load here. You will only see the string encased in the
tags. You will only see the photos load up when you click submit, or when you have finished entering your message and you're in view message mode.
 
Status
Not open for further replies.
Top