Bruce's Journal

Bruce

Herd Master
Joined
Feb 4, 2016
Messages
17,451
Reaction score
45,877
Points
783
Location
NW Vermont
Yeah, it only hurts for about 5 minutes, don't notice it after 10. Makes me pretty certain that if a predator tries to climb over the top they won't try it a second time. Got my order from Premier 1 today so tomorrow I will be putting on the "reverse insulators" to get some "heat" low on the predator side of the fence to deter digging. I figure 1 at 6" and 1 at 12" with cut off switches for each since in the winter when the snow "grows" it will ground out. By the time we get significant snow the ground should be pretty well frozen so no digging is likely and I can just open the switches. Of course I need a pair of switches on the "far" side of each gate.
 

Mike CHS

Herd Master
Joined
Mar 18, 2013
Messages
10,827
Reaction score
39,914
Points
793
Location
Southern Middle TN
I always enjoy reading your journal but I again learned about a way to solve a problem we have. I had never heard of the reverse insulators but after seeing it in your thread had a good idea of what it was and went to Premier1's site to check it out.

That just solved a problem for us where I was thinking the only way was to use step-in posts and poly wire.

Thanks again.
 

Bruce

Herd Master
Joined
Feb 4, 2016
Messages
17,451
Reaction score
45,877
Points
783
Location
NW Vermont
I have the PVC ready to bury under the gates with the insulated hot wire running through it. It was a suggestion made by @greybeard. When it is buried I won't have to worry about driving over the pipe or beating it up with the string trimmer (or beating up the string on the trimmer ;)). The pipe has risers with 180° elbows at the top so no water can get in. Couldn't bury it in Dec, cold ground don't you know! Didn't have enough insulated wire to run the ground through as well so at the moment it runs only to the gate in the west line. But I have more insulated wire in my order so I will run it through the conduit before I bury it. *

I may have to run a low wire on the outside of the gates from the hinge side since there isn't wire running over the top. Probably have to pair it with the ground wire since the j-bolts for the gate hinges go into 6" wood posts, not the best to complete the hot-ground circuit. But if those suckers are touching any part of the fence or the carried ground wire at the same time as the hotwire, I bet I get to hear them scream.

Glad to help Mike! That is what communities like this are for ;)

* Note to anyone who wants to do this: run the wire BEFORE you glue anything together. I glued the 90° elbows and the risers on the ends of the pipe and the insulated wire REALLY doesn't like to make that turn on the far end. Good thing I didn't glue on the 180° parts or I would NEVER be able to run the wire through. I could cut the pipe near one of the 90° elbows to be reconnected with a union but that would sort of be cheating wouldn't it!
 
Last edited:

Bruce

Herd Master
Joined
Feb 4, 2016
Messages
17,451
Reaction score
45,877
Points
783
Location
NW Vermont
It slides fine but the end runs into the 90° at the far end (about 14') and when it tries to turn up into the riser it runs into the edge of the pipe where it bottoms out in the fitting. Since there is only horizontal "push" and no way to change the angle, it jams up into the "corner". I ended up folding it over and taping it so it was thicker and managed to get it in that way.
 

Bruce

Herd Master
Joined
Feb 4, 2016
Messages
17,451
Reaction score
45,877
Points
783
Location
NW Vermont
Got the 5 wires on the outside of the T-posts in the north line today, DD1 helped. I set the gaps at 6", 6", 9", 12", 12". It is about another 6" to the carried ground wire and 6 more to the hot wire on top. I'm leaving those on the inside. One of the new wires(not connected to the charger now) crosses right over a brace wire strainer so I'm going to have to insulate the wire in that location. I have the 2 knife switches installed, daisy chained so the hotwire from the first switch runs both to its wire and to the second switch. Of course they won't be needed until next winter, my "issue" now will be to make sure I keep the vegetation from growing up to the lowest wire.

Plenty of mushy and standing water in some places there. Sure could use a backhoe to create a channel for the water instead of having it sit on the clay over ledge.

There is some green growing and the boys are finding it, they haven't eaten much hay since yesterday. I counted my remaining bales - 20 plus one "open" bale. I bought 38 in the fall. I think maybe I'll buy fewer bales next fall ;)
 

Bruce

Herd Master
Joined
Feb 4, 2016
Messages
17,451
Reaction score
45,877
Points
783
Location
NW Vermont
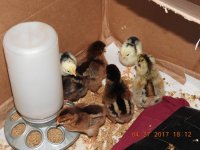
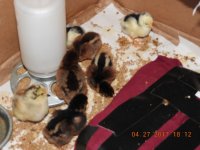
The 7 new chicks arrived at 11:28 AM Tuesday. They had a pretty quick trip given they left Meyers in Ohio around 9 AM Monday.
2 Welsummers (chipmunk with dark and light head),
2 Barnevelders (chipmunk with all dark head),
2 Exchequer Leghorns (yellow and black)
and an Easter Egger.

Here they are with their Mama Heating Pad cave in a cardboard box in our bedroom. MHP raised chicks sleep silently in their cave all night long. During the day they come and go as they feel the need to warm up. The heating pad is strapped up under a metal frame, the entire thing is in a pillow case. They get warm by going in far enough to contact the pad. Actual ambient temp in the cave is unimportant.
DSCN0548.JPG DSCN0549.JPG DSCN0550.JPG DSCN0552.JPG DSCN0553.JPG

And here is a movie, turn up your volume all the way and you might be able to hear the happy chicks.
 

CntryBoy777

Herd Master
Joined
Sep 14, 2016
Messages
8,088
Reaction score
18,455
Points
603
Location
Wstrn Cent Florida
I'll be interested with your thoughts and opinions on the Welsummers. We settled on the "Dotties", but still thinking about adding some later. They are all little darlings....my question is how can ya watch and tape and not talk to them? I just can't do it....I even talk to the ones at the CoOp no matter who is standing there....:)
 
Top